
In this tutorial, we delve into the seamless integration of Authelia with Nginx Proxy Manager, a popular reverse proxy solution known for its simplicity and flexibility. By combining the capabilities of Authelia with the versatility of Nginx Proxy Manager, you can enhance their security posture while efficiently managing their web services.
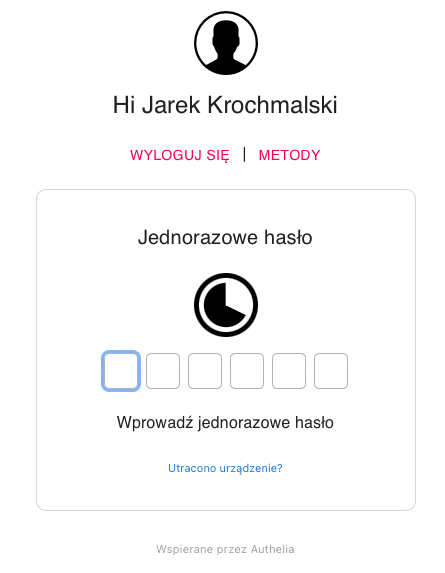
We will setup a multi-factor authentication for the FreshRSS application, exposed via the NginxProxy Manager.
Table of Contents
Creating directories
Before we start containers, we need to have directories created on the host – both for Nginx Pro Manager and Authelia. In this tutorial, we are using /docker as a base directory for mapped directories. Create the following:
/docker/nginxproxymanager/data/docker/nginxproxymanager/letsencrypt/docker/nginxproxymanager/snippets/docker/authelia
Running Nginx Proxy Manager
docker run \
--name=nginxproxy \
--hostname=nginxproxy \
--env=NODE_ENV=production \
--volume=/docker/nginxproxymanager/data:/data \
--volume=/docker/nginxproxymanager/letsencrypt:/etc/letsencrypt \
--volume=/docker/nginxproxymanager/snippets:/snippets \
--workdir=/app \
-p 50443:443 \
-p 50080:80 \
--restart=unless-stopped \
--detach=true \
jc21/nginx-proxy-manager
This Docker command is used to run an instance of Nginx Proxy Manager, let’s break down each part:
docker run: This command is used to run a Docker container.--name=nginxproxy: This sets the name of the Docker container to “nginxproxy”.--hostname=nginxproxy: Sets the hostname inside the container to “nginxproxy”.--env=NODE_ENV=production: Sets the environment variableNODE_ENVto “production” inside the container. This is often used to define the environment in which the application is running.--volume=/docker/nginxproxymanager/data:/data: Mounts the host directory/docker/nginxproxymanager/datato the container directory/data. This is used for persistent storage, ensuring that data generated by Nginx Proxy Manager is stored on the host system.--volume=/docker/nginxproxymanager/letsencrypt:/etc/letsencrypt: Mounts the host directory/docker/nginxproxymanager/letsencryptto the container directory/etc/letsencrypt. This is where SSL certificates generated by Let’s Encrypt will be stored.--volume=/docker/nginxproxymanager/snippets:/snippets: Mounts the host directory/docker/nginxproxymanager/snippetsto the container directory/snippets. This is typically used for storing Nginx configuration snippets.--workdir=/app: Sets the working directory inside the container to/app. This is where the application code will be executed.-p 50443:443: Maps port 50443 on the host to port 443 inside the container. This exposes the HTTPS (443) port of Nginx Proxy Manager to the host.-p 50080:80: Maps port 50080 on the host to port 80 inside the container. This exposes the HTTP (80) port of Nginx Proxy Manager to the host.--restart=unless-stopped: Specifies that the container should automatically restart unless explicitly stopped by the user.--detach=true: Runs the container in detached mode, meaning it runs in the background.
Finally, jc21/nginx-proxy-manager specifies the Docker image to use for creating the container.
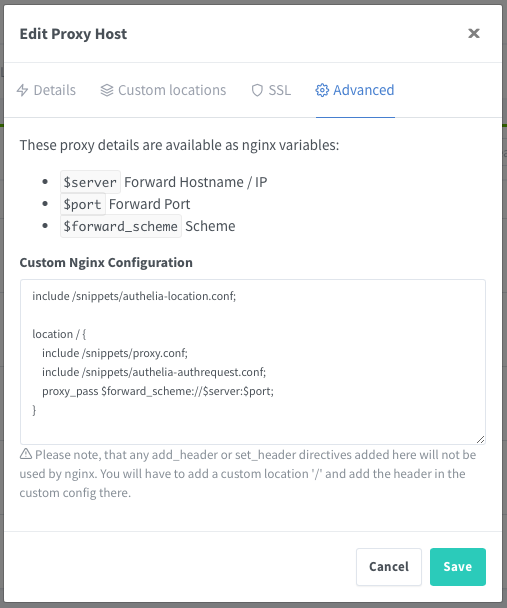
Authelia snippets for NginxProxy Manager
We are going to use the domain rss.yourhost.com poining to the FreshRSS service. The necessary configuration snippets for Authelia needs to be placed in /docker/nginxproxymanager/snippets on the host, which is mapped to the /snippets directory in the NginProxy container. Files we need to create are:
proxy.confauthelia-location.confauthelia-authrequest.conf
proxy.conf
## Headers
proxy_set_header Host $host;
proxy_set_header X-Original-URL $scheme://$http_host$request_uri;
proxy_set_header X-Forwarded-Proto $scheme;
proxy_set_header X-Forwarded-Host $http_host;
proxy_set_header X-Forwarded-Uri $request_uri;
proxy_set_header X-Forwarded-Ssl on;
proxy_set_header X-Forwarded-For $remote_addr;
proxy_set_header X-Real-IP $remote_addr;
proxy_set_header Connection "";

## Basic Proxy Configuration
client_body_buffer_size 128k;
proxy_next_upstream error timeout invalid_header http_500 http_502 http_503; ## Timeout if the real server is dead.
proxy_redirect  http://  $scheme://;
proxy_http_version 1.1;
proxy_cache_bypass $cookie_session;
proxy_no_cache $cookie_session;
proxy_buffers 64 256k;

## Trusted Proxies Configuration
## Please read the following documentation before configuring this:
##     https://www.authelia.com/integration/proxies/nginx/#trusted-proxies
# set_real_ip_from 10.0.0.0/8;
# set_real_ip_from 172.16.0.0/12;
# set_real_ip_from 192.168.0.0/16;
# set_real_ip_from fc00::/7;
real_ip_header X-Forwarded-For;
real_ip_recursive on;

## Advanced Proxy Configuration
send_timeout 5m;
proxy_read_timeout 360;
proxy_send_timeout 360;
proxy_connect_timeout 360;
authelia.conf
set $upstream_authelia http://authelia:9091/api/verify;

## Virtual endpoint created by nginx to forward auth requests.
location /authelia {
    ## Essential Proxy Configuration
    internal;
    proxy_pass $upstream_authelia;

    ## Headers
    ## The headers starting with X-* are required.
    proxy_set_header X-Original-URL $scheme://$http_host$request_uri;
    proxy_set_header X-Original-Method $request_method;
    proxy_set_header X-Forwarded-Method $request_method;
    proxy_set_header X-Forwarded-Proto $scheme;
    proxy_set_header X-Forwarded-Host $http_host;
    proxy_set_header X-Forwarded-Uri $request_uri;
    proxy_set_header X-Forwarded-For $remote_addr;
    proxy_set_header Content-Length "";
    proxy_set_header Connection "";

    ## Basic Proxy Configuration
    proxy_pass_request_body off;
    proxy_next_upstream error timeout invalid_header http_500 http_502 http_503; # Timeout if the real server is dead
    proxy_redirect http:// $scheme://;
    proxy_http_version 1.1;
    proxy_cache_bypass $cookie_session;
    proxy_no_cache $cookie_session;
    proxy_buffers 4 32k;
    client_body_buffer_size 128k;

    ## Advanced Proxy Configuration
    send_timeout 5m;
    proxy_read_timeout 240;
    proxy_send_timeout 240;
    proxy_connect_timeout 240;
}
authelia-authrequest.conf
## Send a subrequest to Authelia to verify if the user is authenticated and has permission to access the resource.
auth_request /authelia;

## Set the $target_url variable based on the original request.

## Comment this line if you're using nginx without the http_set_misc module.
set_escape_uri $target_url $scheme://$http_host$request_uri;

## Uncomment this line if you're using NGINX without the http_set_misc module.
# set $target_url $scheme://$http_host$request_uri;

## Save the upstream response headers from Authelia to variables.
auth_request_set $user $upstream_http_remote_user;
auth_request_set $groups $upstream_http_remote_groups;
auth_request_set $name $upstream_http_remote_name;
auth_request_set $email $upstream_http_remote_email;

## Inject the response headers from the variables into the request made to the backend.
proxy_set_header Remote-User $user;
proxy_set_header Remote-Groups $groups;
proxy_set_header Remote-Name $name;
proxy_set_header Remote-Email $email;

## If the subreqest returns 200 pass to the backend, if the subrequest returns 401 redirect to the portal.
error_page 401 =302 https://auth.example.com/?rd=$target_url;
Configuring Authelia
file:
path: /config/users_database.yml
watch: false
search:
email: false
case_insensitive: false
password:
algorithm: argon2
argon2:
variant: argon2id
iterations: 3
memory: 65536
parallelism: 4
key_length: 32
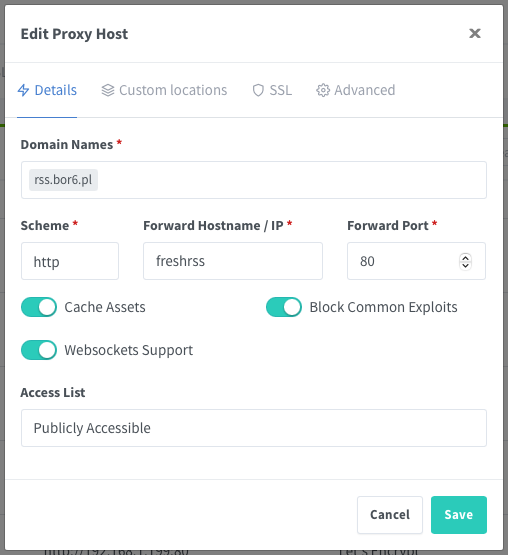
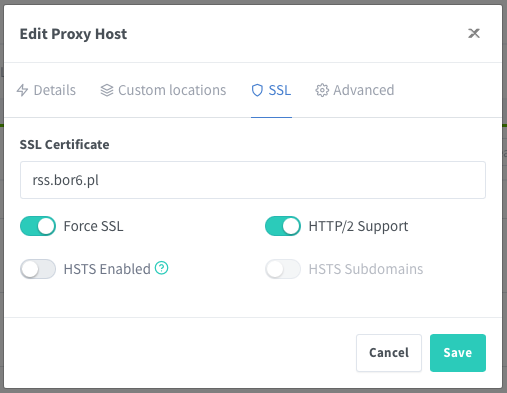
salt_length: 16Configuring a service on Nginx Proxy Manager
Generating Authelia passwords
docker run --rm authelia/authelia:latest authelia crypto hash \
generate argon2 --password 'password'
This command runs a container based on the image authelia/authelia:latest.Here’s a breakdown of the command and its components:
docker run: This command is used to run a Docker container.--rm: This flag tells Docker to remove the container after it exits. This is often used to keep the system clean from temporary containers.authelia/authelia:latest: This is the name of the Docker image that Docker will use to create the container. In this case, it’sauthelia/authelia, andlatestis the tag indicating that the latest version of Authelia should be used.authelia: This is the entry point within the Docker container. It specifies the Authelia binary or executable that should be run.crypto: This is an argument passed to Authelia, specifying that a cryptographic operation should be performed.hash: This is a sub-command of thecryptocommand, specifying that a hash should be generated.generate argon2: This specifies the hashing algorithm to be used, in this case, Argon2. Argon2 is a widely regarded hashing algorithm known for its resistance to GPU cracking attacks.--password 'password': This is the password for which the hash will be generated. In this example, ‘password’ is a placeholder for the actual password you want to hash.
So, when you run this command, Docker will start a container based on the Authelia image, run the Authelia binary within it, instruct it to generate an Argon2 hash for the provided password (‘password’ in this case), and then remove the container after the operation is complete.